Double-hung replacement windows
In this article, we'll show you step by step how to remove the old sash from double-hung windows and mount either a new sash kit or a wood or vinyl replacement insert inside your existing window jamb. Even a beginner can do it.
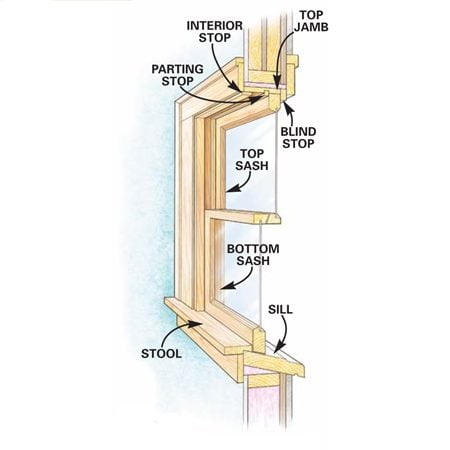
Both the sash replacement kit and the wood or vinyl replacement insert mount inside your existing window jamb, in the place that was occupied by the old sash. They both fit in the space between the outside stop, called the blind stop, and the removable interior stop (see Fig. A). The sash replacement kit is designed to replace the sash in double-hung windows only. Wood or vinyl replacement inserts, on the other hand, are self-contained units with their own jamb and sash, and can therefore be slid into almost any type of window jamb. They are available as double-hung, sliding or casement-style windows.
Either type of replacement window must be installed in a solid, rot-free jamb. Inspect your old window frame carefully for signs of water damage. Pay particular attention to the sill. Probe with a screwdriver to uncover hidden soft spots. Normal exposure to rain and snow often causes the exposed parts of poorly maintained windowsills or the lower sections of the exterior trim to rot. An experienced carpenter can usually repair these areas with sections of new wood or you can use an epoxy repair system. Rot along the top or interior parts of windows, including the window jamb, is more difficult to repair and often signals a bigger problem. Don't mess with repairs. Plan on tearing out the entire window and installing a new one.
Measure carefully
Measure very carefully before you place an order, no matter what type you install. There's nothing worse than discovering that your nonreturnable, custom-sized window doesn't fit. Measure the width between the side jambs at the top, middle and bottom and record the smallest measurement. Measure all the way to the jamb, not the blind stop or parting stop (see Fig. A). Now measure the height from the top jamb to the sill (see Fig. A). Measure both sides and the middle and record the smallest measurement. Finally, determine the sill angle (Photo 1) and specify this when you order a sash replacement kit to make sure the jamb liners fit tight to the sill. This step isn't necessary for ordering wood or vinyl replacement inserts. Keep a record of all correspondence with your window supplier and ask for a written confirmation before the windows are ordered so you can double-check the sizes.
If your house was built before about 1940, you'll likely have double-hung windows with sash weights and cords like the ones shown in this article. Newer double-hungs may have springs or jamb liners instead, but once these are removed, the installation process is the same.
Parts of a double-hung window
Figure A: Window parts
It helps to understand the part of the window.
Replacement inserts or sash replacement kits?
1 of 4
Replacement window insert
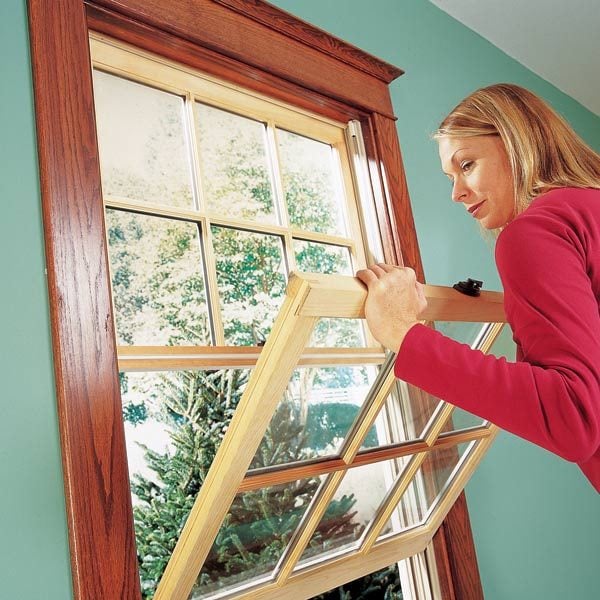
Replacement window inserts tilt into the existing frame.
Option 1: Wood or vinyl replacement inserts
For a maintenance-free window that doesn't require any painting or staining, consider vinyl replacement windows. Some companies even make a simulated wood grain interior. Since wood or vinyl replacement inserts have their own jamb, they can be installed in window jambs that are slightly out of square. Ask your window dealer for help measuring, though, since you'll have to downsize the window slightly to fit.
Shopping for replacement windows is a little trickier than buying sash kits because the quality of the windows varies dramatically and many are available only to contractors. Make sure to inspect and operate an actual working model of the window before you order. Look closely at details like the locking system, weatherstripping, and sash and frame joints. Then consider the overall appearance. Some windows, like ours, have narrow vinyl sash parts that allow more light and a better view than windows with wide sash frames.
Option 2: Double-hung sash replacement kits
If you want to retain the authentic wood look of your old double-hung windows, sash replacement kits are the best option. You can order the sashes with grilles to match the rest of the windows in your house and paint or stain the wood. (You can choose grilles that either snap in or are glued to the glass.) But your old window jamb must be square and rot-free. Measure diagonally. If the diagonal measurements differ by more than 1/2 in., the new sash won't seal properly and you should replace the window or use a vinyl replacement window instead.
Double-hung sash replacement kits consist of two new wood window sashes, two vinyl jamb liners and installation hardware. Features like energy-efficient low-E glass, simulated divided lites and maintenance-free exterior cladding are available for an extra cost. Contact the manufacturer for more information about options and to find out where to order windows in your area.
Installing wood or vinyl replacement inserts
1 of 9
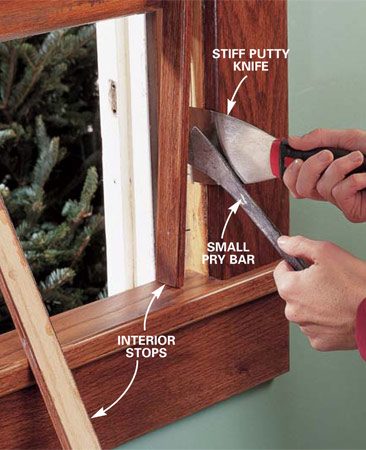
Photo 1: Gently pry off the interior stops
Pry against a stiff putty knife to protect the wood. To minimize paint chipping on painted windows, score the joint between the window frame and stop with a utility knife before prying off the stop. Pull the nails through the backside of the stop with a nail nipper or pliers. Complete the window prep by following Photos 2 and 3.
Start your replacement insert installation by removing the interior stop, sash and parting stop. The parting stop is usually caked with paint and difficult to remove. Use a pliers (Photo 3) to break out the lower section. If the upper sash is stuck, pry or break out the upper section of parting stop with a chisel. If your windows have spring balances or metal jamb liners rather than sash weights like ours, start by removing the interior stops (Photo 1). Then look for the screws or nails that secure the sash hardware and remove them. The goal is to remove all hardware back to the blind stops (Photo 2). You don't have to worry about dinging up the jamb and sill because they’ll be covered. If your window has a sash weight cavity, stuff it with insulation.
Make sure your window insert is square
Your wood or vinyl replacement insert will be slightly smaller than the window jamb opening to allow for shimming. The key to a window that operates smoothly and seals properly is getting the frame perfectly square and the sides straight. Photos 4 — 6 show how. Don't be afraid to remove the screws and readjust the window in the opening if necessary. In addition to checking the window by measuring the diagonals (Photo 5), open and close the sashes to make sure the tops and bottoms are parallel with the sill and top jamb and that the top and bottom sashes are parallel to each other where they meet in the middle. Keep tweaking the shims until everything is square and lined up. Then snug but don't overtighten the screws. Complete the installation by reinstalling the interior stops (Photo 7) and sealing up the exterior (Photos 8 and 9). You can also install wood or vinyl replacement inserts in casement and sliding window jambs. We won't talk about them in detail here. Be sure to read the installation instructions that come with each window.
CAUTION!
Houses built before 1978 may contain lead paint. Before disturbing any surface, get a lab analysis of paint chips from it. Contact your public health department for information on how to collect samples and where to send them. Do-it-yourself lead testing kits are also available at home centers and hardware stores.
Installing double-hung sash kits
1 of 9
Photo 1: Determine the bottom angle of the sash
Align the edge of a heavy piece of paper with the window stop and fold the bottom to match the angle of the sill. Lay a protractor (Fig. B) on the folded paper to determine the angle. Then measure the interior height and width of the window frame. Use these measurements to order your sash replacement kit.
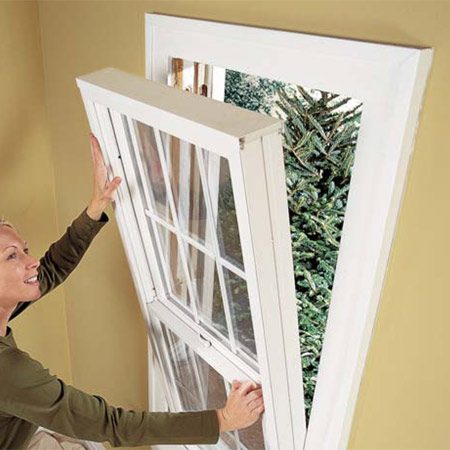
The toughest part of sash replacement is tearing out the old window. You have to pry off the stop (carefully for reuse) and the parting stop (which you can discard; see Photo 3). You can either nail or screw the new liner clips in place (Photo 4). We chose screws because driving nails can be difficult in old window jambs. Be sure to leave a 1/16-in. space between the clip and the blind stop or the jamb liner won't snap in (Photo 5). Then replace the interior stops and top parting stop (Photo 6). Read the instructions included with your window for the exact procedure to use for lowering the sash lifts (Photo 7) and tilting the sash into place. If you have trouble pushing in the sash after you tilt it up, try working with one side at a time.
Compress the jamb liner with one hand while you ease one top corner of the sash in with the other. Then repeat the process on the other side. Also position the top of the sash toward the center of the opening.
Cost $100-$500 per window depending on the features you select.
Source:
http://www.familyhandyman.com/DIY-Projects/Doors---Windows/Window-Replacement/how-to-install-replacement-windows/Step-By-Step
Local Atlanta supplier:
http://www.stockbuildingsupply.com/doorswindowsstairs